不用自己买服务器和域名,用 GitHub Pages 就能搭建属于自己的hexo博客。
环境准备
安装 Node.js
安装git
安装hexo命令行工具
1
2
| npm install -g hexo-cli
hexo --version
|
step1: 创建github仓库
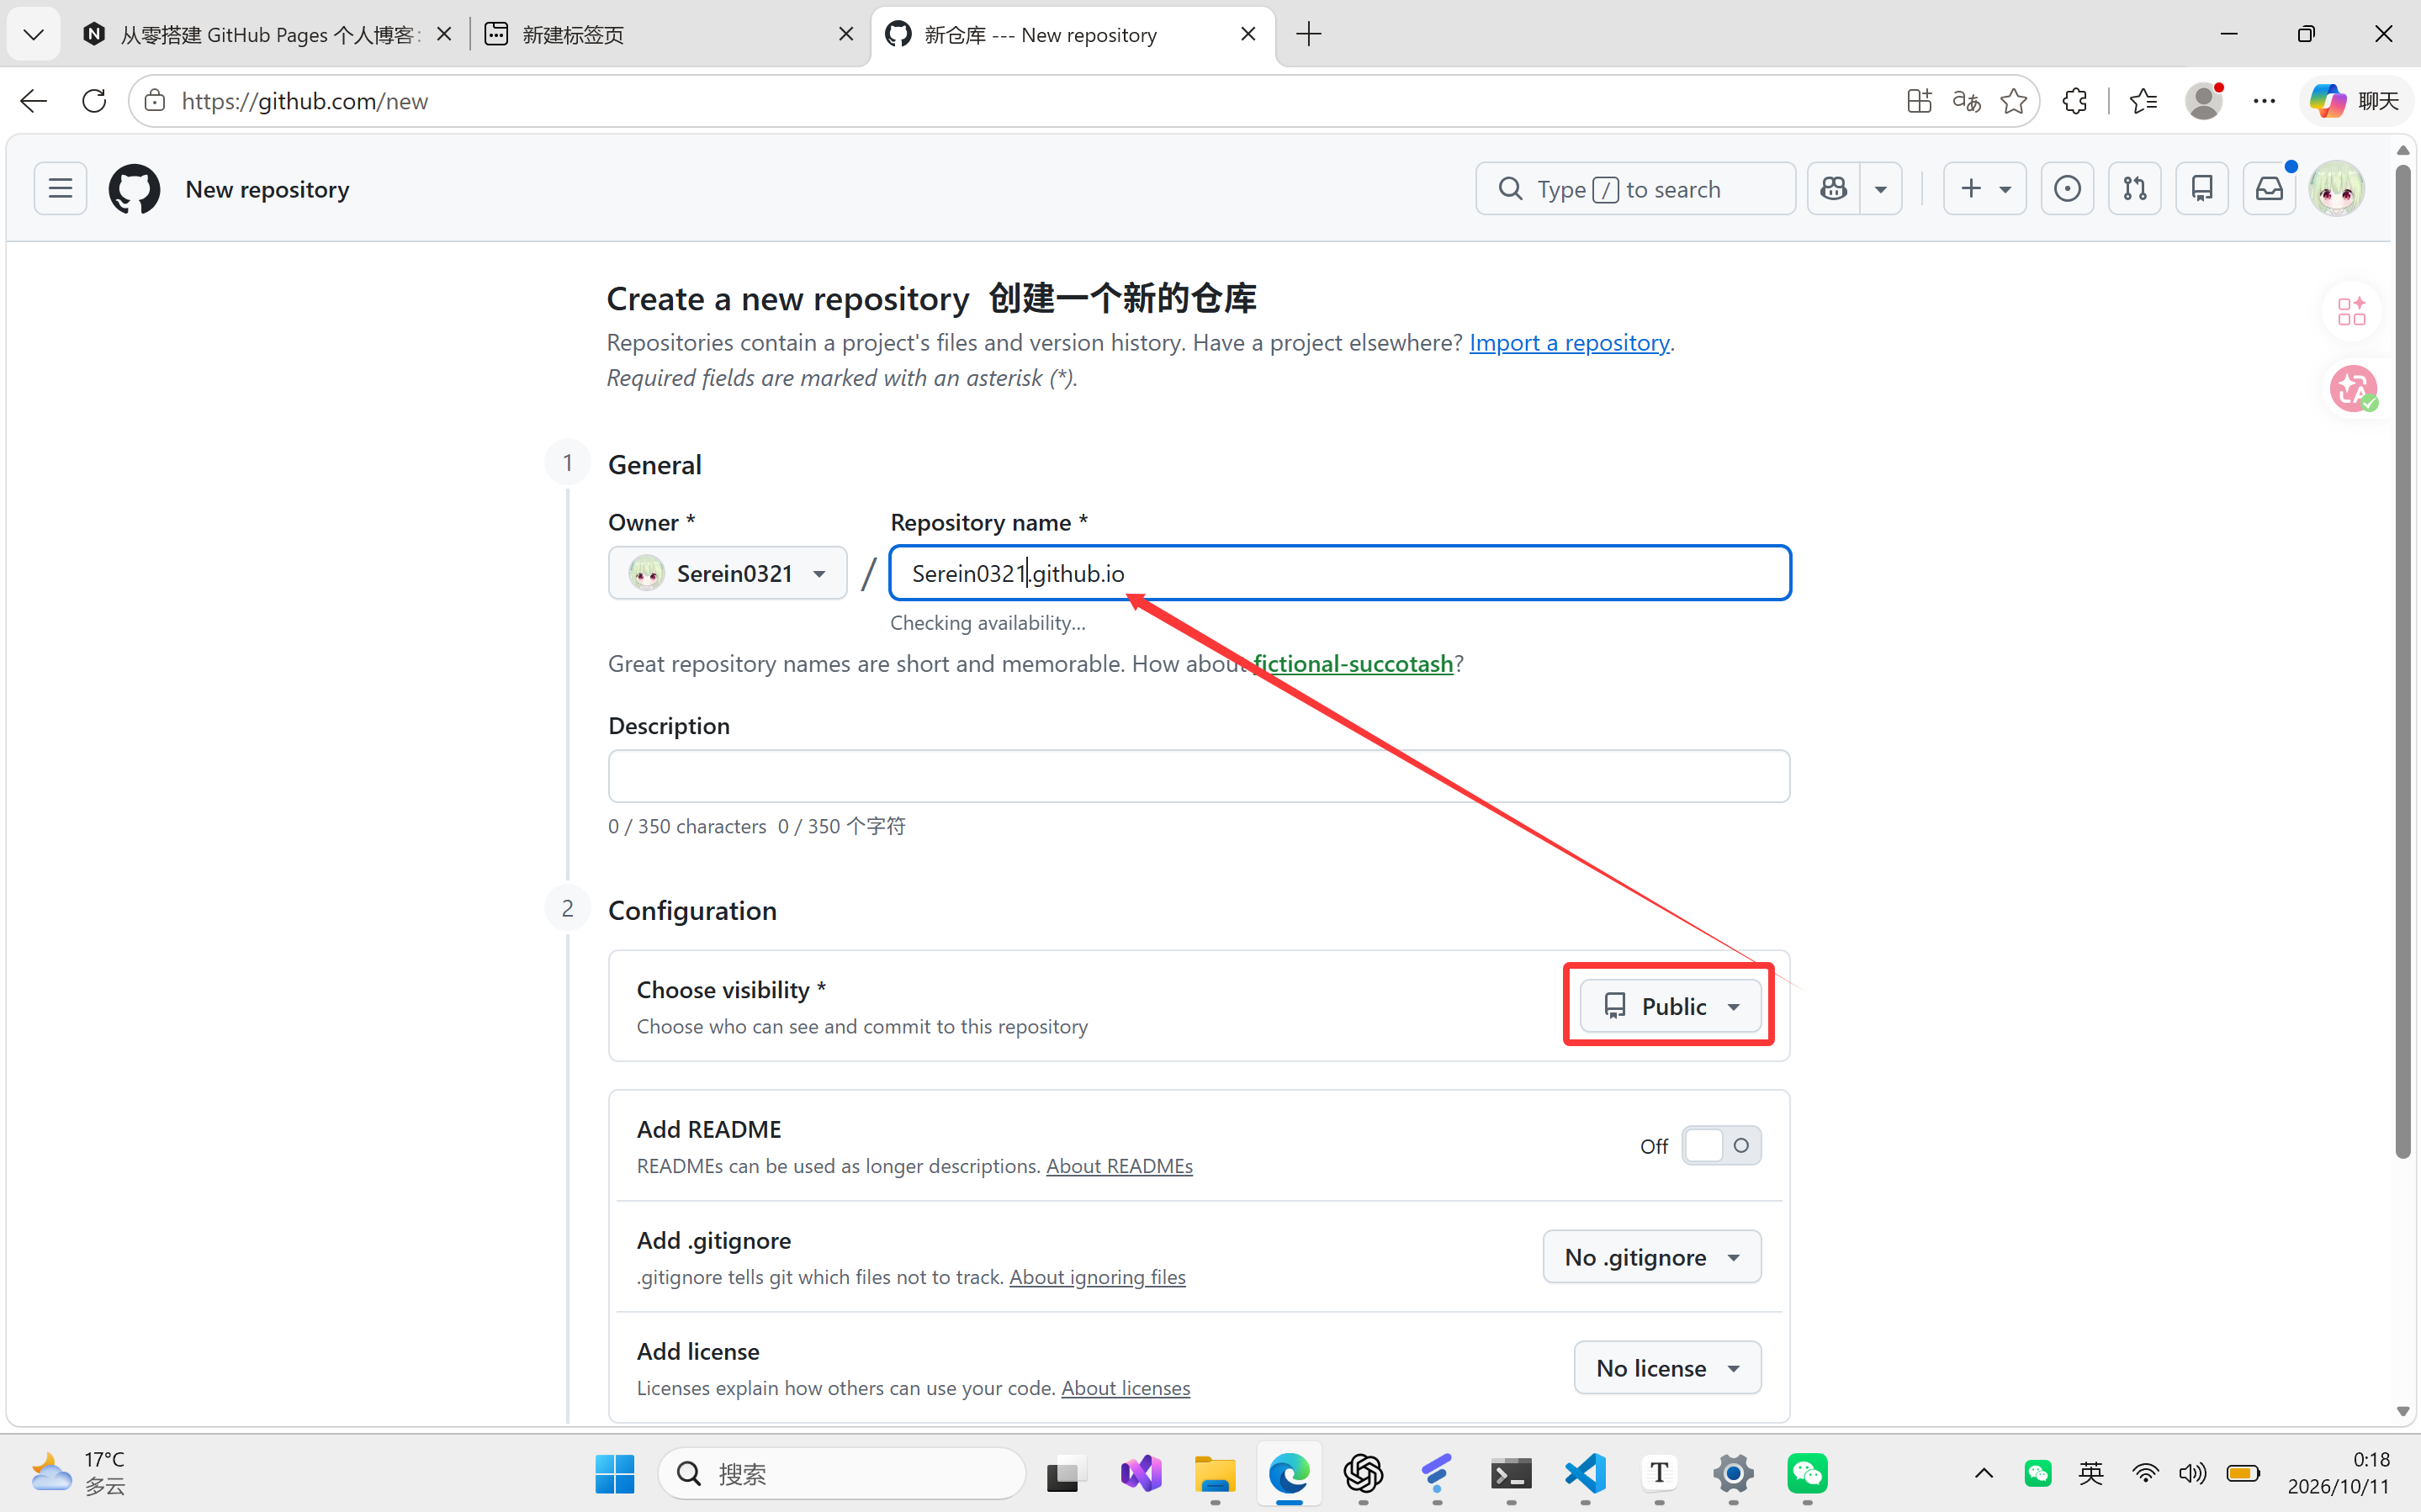
登录 GitHub,点击右上角的 “+” → “New repository”,创建一个名为 你的用户名.github.io 的公开仓库。例如我的用户名是 Serein0321,就创建 Serein0321.github.io。
step2: 初始化 Hexo 项目
环境准备就绪,现在开始搭建博客。
认识博客项目
1
2
3
4
5
6
7
8
9
10
11
12
13
14
15
16
17
18
19
20
21
| D:\blog\Serein0321.github.io\
├─ _config.yml 博客整体配置
├─ package.json 项目依赖清单
├─ package-lock.json npm 依赖版本记录
├─ scaffolds\ 创建文章和页面时使用的模板
├─ source\ 自己维护的内容
│ ├─ _posts\ 正式文章及各篇文章的同名资源文件夹
│ ├─ _drafts\ 草稿,使用时才会创建
│ ├─ _data\ 自定义模板等文件
│ ├─ images\ 头像等公共图片
│ ├─ tags\ 标签页面
│ ├─ categories\ 分类页面
│ └─ about\ 关于页面
├─ themes\
│ └─ next\ 后面安装的 NexT 主题
│ ├─ _config.yml NexT 主题配置
│ ├─ layout\ 页面模板
│ └─ source\ 主题自带资源
├─ node_modules\ npm 安装的依赖
├─ public\ Hexo 生成的网页
└─ .deploy_git\ 部署插件的临时工作目录
|
创建博客项目
1
2
3
4
5
6
7
8
9
10
11
| # 进入项目目录
cd D:/blog
# 初始化 Hexo 项目
hexo init Serein0321.github.io --no-install
# 进入项目目录
cd Serein0321.github.io
# 安装依赖
npm install
|
配置 _config.yml
打开项目根目录的 _config.yml,修改以下配置:
1
2
3
4
5
6
7
8
9
10
11
12
13
14
15
16
17
18
19
20
21
22
23
24
25
26
27
| # Site
title: Serein0321's Blog
subtitle: 技术博客
description: 个人技术博客
author: Serein0321
language: zh-CN
# Deployment
deploy:
type: git
repo: https://github.com/Serein0321/Serein0321.github.io.git
branch: master
### 配置 RSS 和搜索
feed:
type: atom
path: atom.xml
limit: 20
search:
path: search.xml
field: post
format: html
limit: 10000
#配置 Next 主题
theme: next
|
step3: 安装和配置 Next 主题
克隆 Next 主题
1
2
| cd Serein0321.github.io
git clone https://github.com/theme-next/hexo-theme-next themes/next
|
配置Next的config.yml
打开\Serein0321.github.io\themes\next\_config.yml后按照下面的来进行配置。
1
2
3
4
5
6
7
8
9
10
11
12
13
14
15
16
17
18
19
20
21
22
23
24
25
26
27
28
29
30
31
32
33
34
35
36
37
38
39
40
41
42
43
44
45
46
47
48
| #选择布局
scheme: Pisces
#设置菜单
menu:
home: / || fa fa-home
tags: /tags/ || fa fa-tags
categories: /categories/ || fa fa-th
archives: /archives/ || fa fa-archive
about: /about/ || fa fa-user
# 返回顶部 + 阅读百分比
back2top:
enable: true
scrollpercent: true
# 阅读进度条
reading_progress:
enable: true
position: top
color: "#37c6c0"
height: 3px
# 书签
bookmark:
enable: true
save: auto
# GitHub Banner
github_banner:
enable: true
permalink: https://github.com/你的用户名
title: Follow me on GitHub
# 中英文空格自动排版
pangu: true
# 数学公式
math:
mathjax:
enable: true
# Pjax 局部刷新
pjax: false
# 本地搜索
local_search:
enable: true
|
安装必需插件
Next 主题的许多功能需要额外安装插件:
1
2
3
4
5
6
7
8
9
10
11
12
13
| # RSS 订阅
npm install hexo-generator-feed --save
# 本地搜索
npm install hexo-generator-searchdb --save
# 数学公式支持
npm uninstall hexo-renderer-marked --save
npm install hexo-renderer-kramed --save
#Pjax依赖
cd themes/next
git clone https://github.com/theme-next/theme-next-pjax source/lib/pjax
|
step4: 创建标签和分类页面
1
2
3
| cd Serein0321.github.io
hexo new page tags
hexo new page categories
|
修改生成的 source/tags/index.md:
1
2
3
| title: 标签
type: tags
comments: false
|
同样修改 source/categories/index.md:
1
2
3
| title: 分类
type: categories
comments: false
|
step5: 添加评论功能
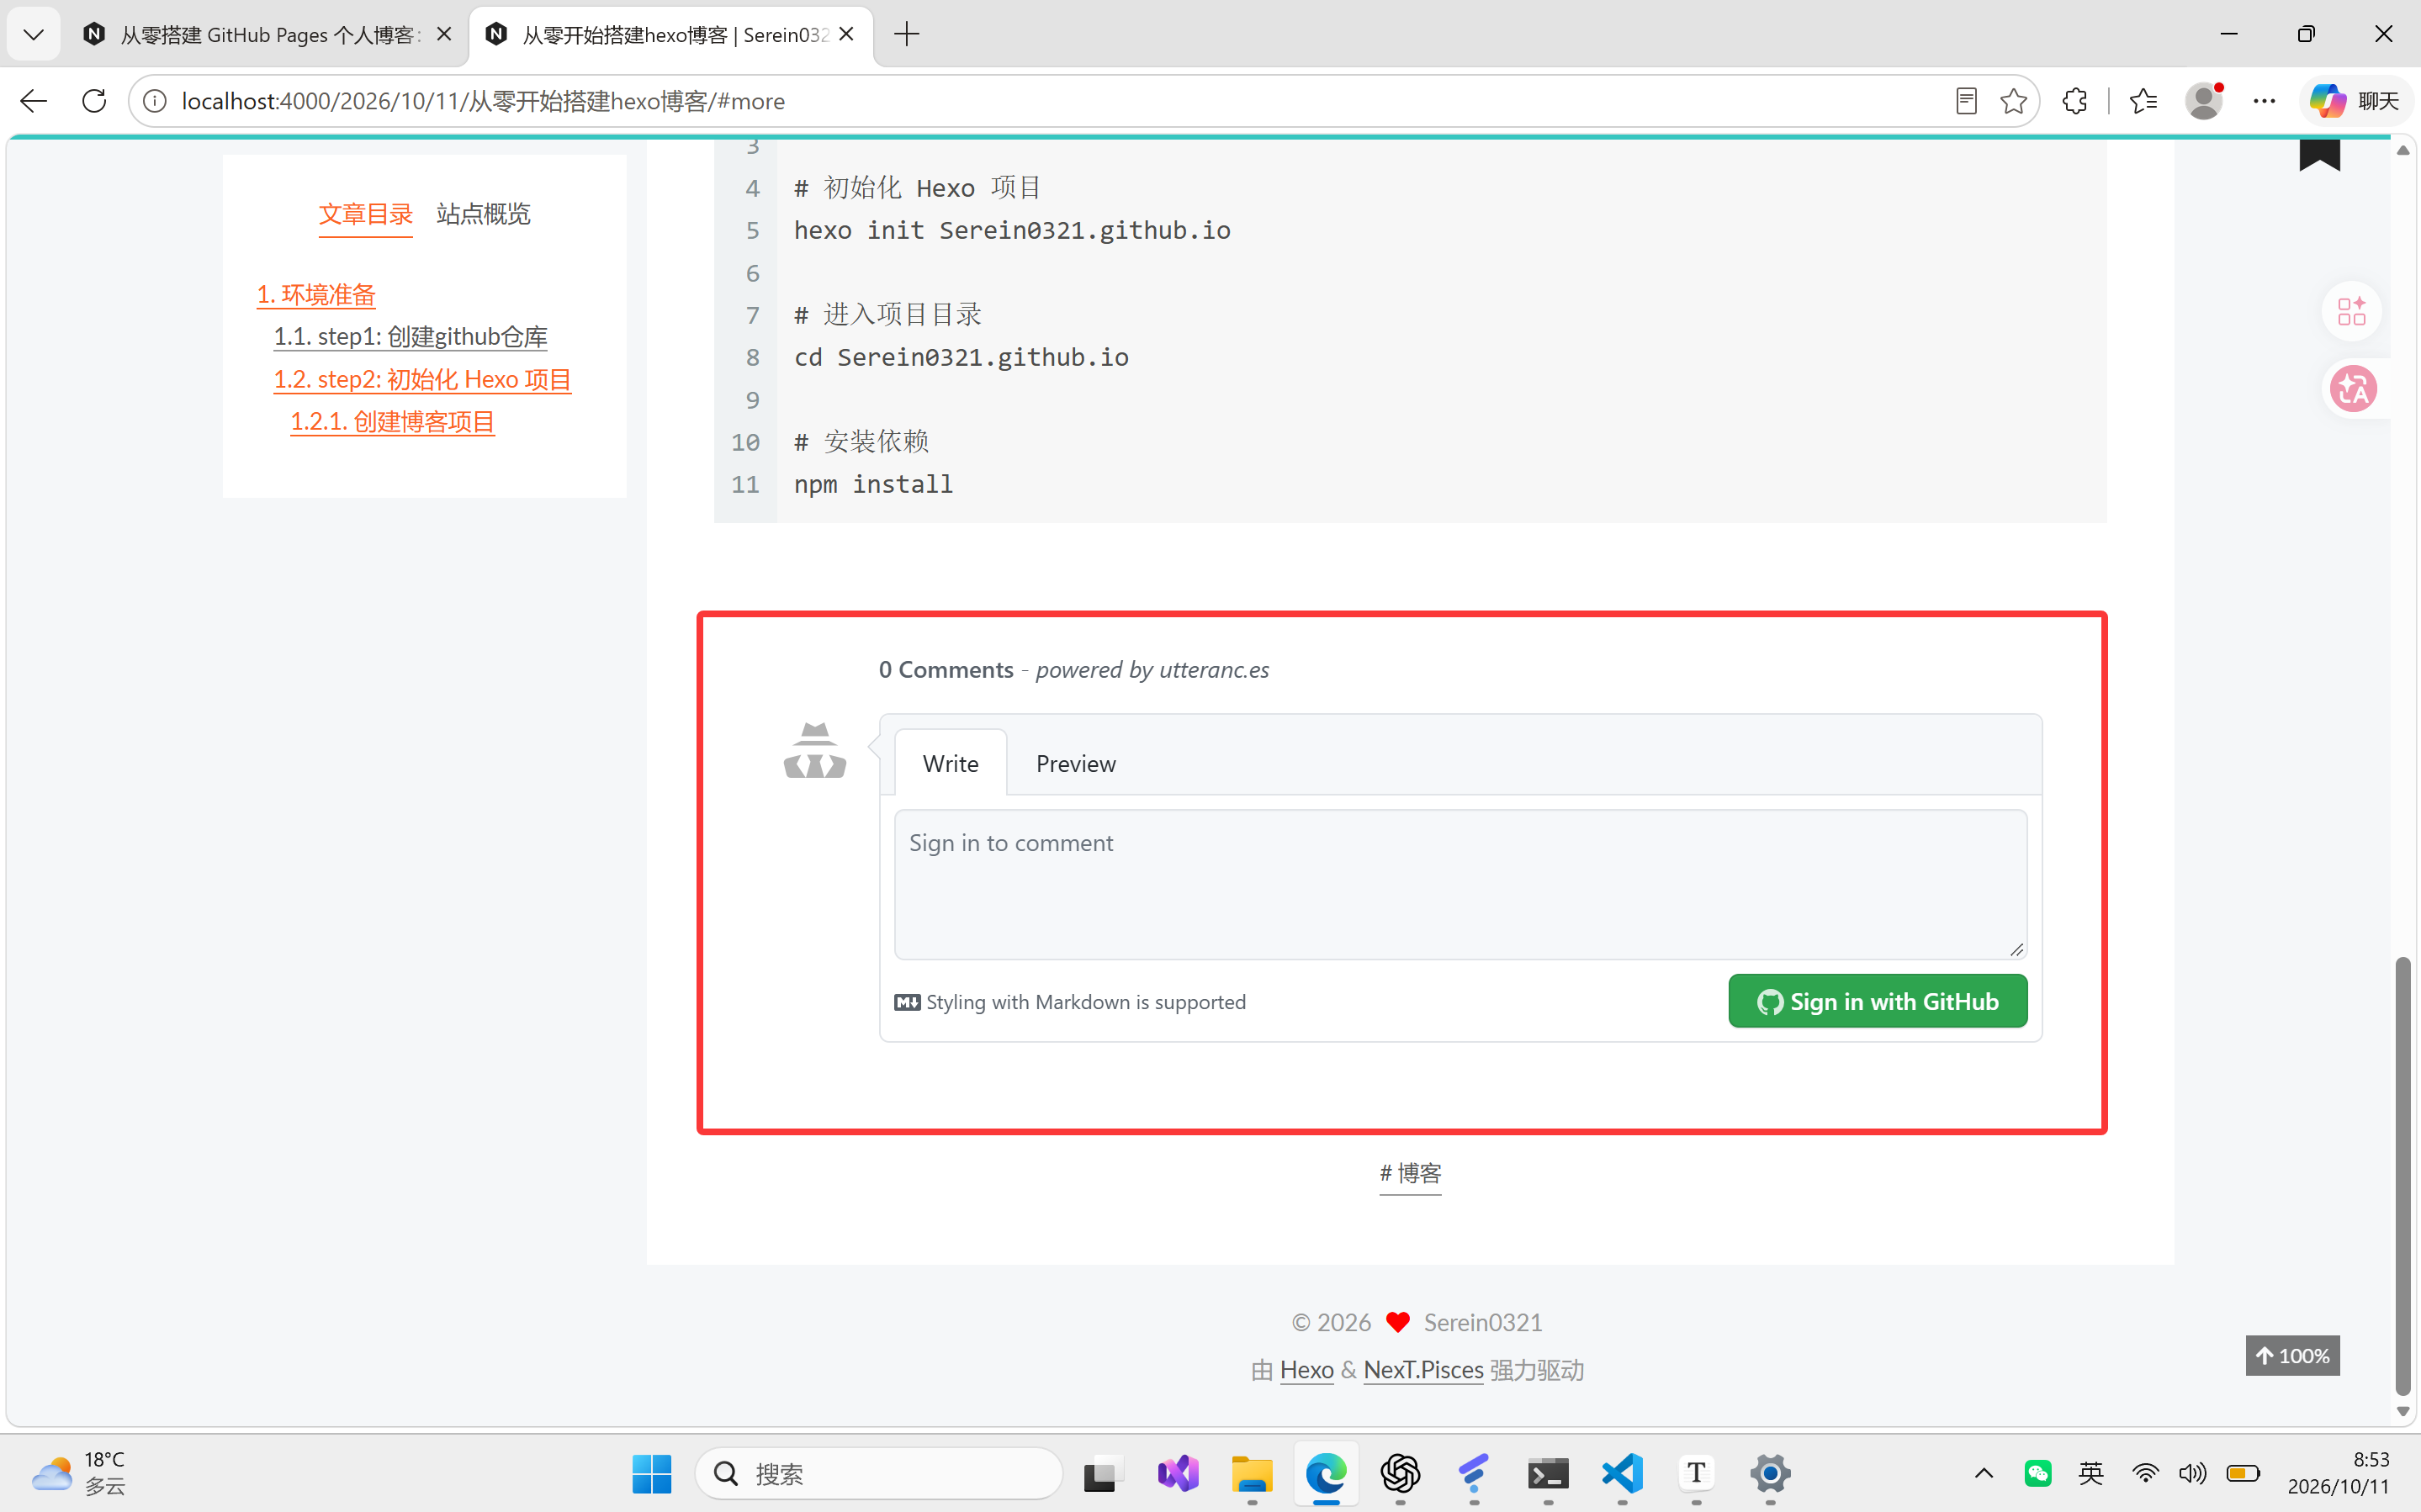
功能演示:
安装 Utterances App
首先需要为你的 GitHub 仓库安装 Utterances 应用:
- 访问 https://github.com/apps/utterances
- 点击 “Install”
- 选择 “Only select repositories”
- 选中你的博客仓库(如
Serein0321.github.io)
- 点击 “Install”
配置评论
在博客目录下创建自定义评论文件:
创建 source/_data/comments.swig 文件:
1
2
3
4
5
6
7
8
9
| <div class="comments" id="comments">
<script src="https://utteranc.es/client.js"
repo="你的用户名/你的用户名.github.io"
issue-term="pathname"
theme="github-light"
crossorigin="anonymous"
async>
</script>
</div>
|
然后在主题配置中启用自定义文件:
编辑 themes/next/_config.yml,找到 custom_file_path 部分,取消注释 postBodyEnd:
1
2
| custom_file_path:
postBodyEnd: source/_data/comments.swig
|
启用文章评论
在每篇文章的 Front-matter 中添加 comments: true:
1
2
| title: 你的文章标题
comments: true
|
step6: 添加头像
功能演示:
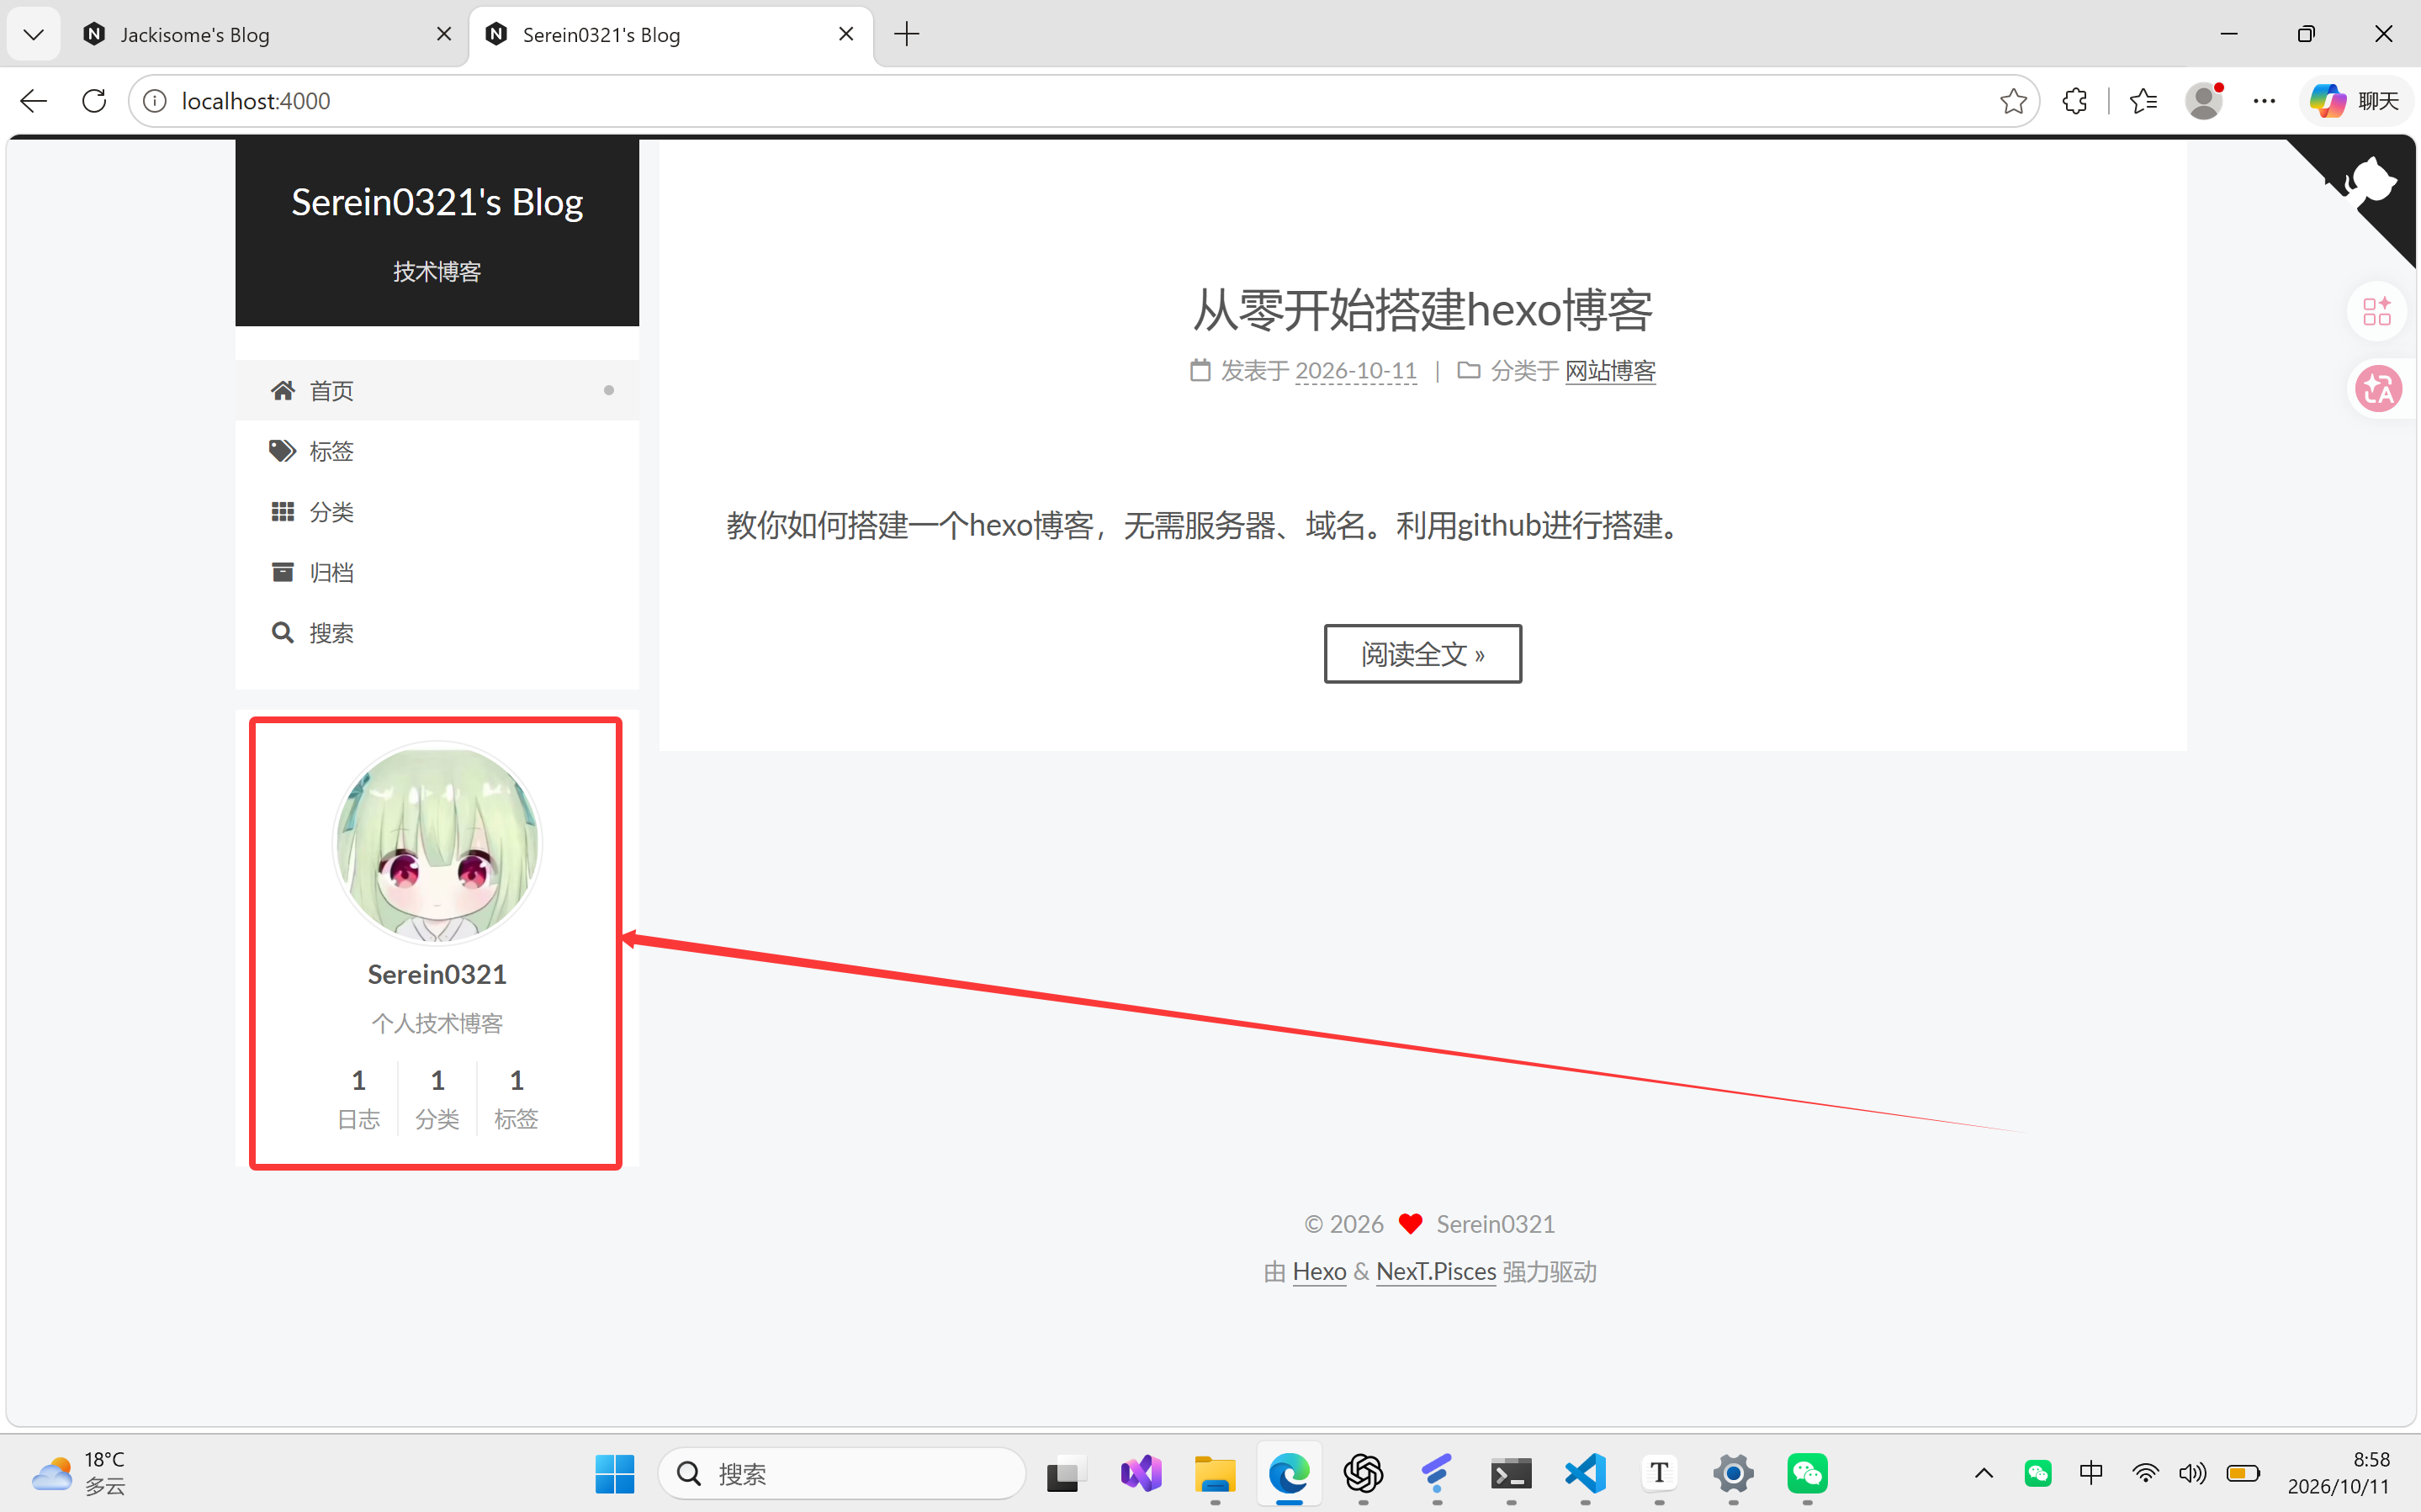
将头像图片放入 themes/next/source/images/avatar.png,然后在配置\Serein0321.github.io\themes\next\_config.yml中添加:
1
2
3
4
| avatar:
url: /images/avatar.png
rounded: true
rotated: true
|
step7: 部署到github
安装部署插件
1
| npm install hexo-deployer-git --save
|
部署插件负责在执行 hexo deploy 时,自动将生成的网页提交并推送到指定仓库。安装插件本身不会上传网页。
上传github
1
| hexo clean && hexo generate && hexo deploy
|
使用教程
先设置新建文章的默认模板
执行 hexo new "文章标题" 时,Hexo 会读取 scaffolds\post.md,根据它创建新文章。希望每篇文章自动带上评论开关、分类、标签和正文结构,就修改这个模板。
打开:
1
| D:\blog\Serein0321.github.io\scaffolds\post.md
|
将文件内容替换为下面的模板,保存:
1
2
3
4
5
6
7
8
9
10
11
12
13
14
15
16
17
18
| ---
title: {{ title }}
date: {{ date }}
categories:
- 分类
tags:
- 标签1
- 标签2
comments: true
mathjax: true
---
在这里写摘要
<!-- more -->
在这里写内容
|
模板中的字段含义如下:
| 内容 |
新建文章时的作用 |
{{ title }} |
自动替换为 hexo new 命令中填写的标题 |
{{ date }} |
自动替换为创建文章的日期和时间 |
categories: [] |
预留分类字段,暂时不分配分类 |
tags: [] |
预留标签字段,暂时不分配标签 |
comments: true |
默认允许文章显示评论组件;评论服务仍需按第 15 节配置 |
mathjax: false |
默认不启用这篇文章的公式渲染,需要公式时改成 true |
<!-- more --> |
将前面的正文作为首页摘要 |
| 正文小标题 |
每篇新文章自动带上写作结构,可以按文章需要修改 |
常用命令汇总
| 命令 |
说明 |
hexo new "标题" |
创建新文章 |
hexo generate |
生成静态文件 |
hexo server |
启动本地服务器 |
hexo deploy |
部署到 GitHub |
hexo clean |
清理缓存 |
为每个博客配资源文件夹
在博客根配置中修改已有字段,设置默认文章类型,同时开启每篇文章的资源文件夹:
1
2
| default_layout: post
post_asset_folder: true
|
这样创建用于存放该文章图片的同名文件夹。在文档里引用图片就用:
1
2
3
| {% asset_img 首页.png 博客首页截图 %}
{% asset_img 配置截图.png 配置文件截图 %}
|
本地浏览
1
| hexo clean && hexo generate && hexo server
|